
Map of Floor 1 and 2
This dungeon opens after the hero obtains the sickle (see: Getting Started) and an event where Mist asks him nicely to handle some weeds growing outside of her house.
Cut the grass and then approach the opening that is uncovered to unlock this dungeon. The earliest possible time that the ruins can be unlocked is on Spring 2.
Entrance: Beach Road
Note: 1) The grass in front of Mist's house cannot be cut until she is spoken to with a friendship of at least 6 (Gift Mist 3 items) and after obtaining the Sickle from Stella (Gift Stella 2 items).
2) Cutting the grass and then leaving Beach Road without attempting to enter the Ruins causes the grass to reappear. While, inversely, cutting only enough grass to enter the Ruins and then walking inside causes all of the uncut grass to vanish.
The map links below link to basic layout maps of each floor or a full drawn map of the whole dungeon can be found here: Green Ruins Full Map.
Floor B1F[]

B1F Map

B1F Map (printable)
Floor B1F contains the most mining rocks in the Green Ruins as well as the most plots of land to use for farming. The first 2 plots of land are located directly by the entrance. This floor contains 5 chests and 9 crates which can be exploited to receive Rice, Cucumber, Turnip, Root, Antidote Drink, Para-gone, and Energy Drink. From the mining rocks, Iron, Scrap Iron and Copper of all levels, Elemental Crystals, and Jewels can be obtained. This is also the floor on which the player battles both Brodik and his Golem.
See 'Boss Strategy' for more information.
Getting from B1F to B2F is simple. For starters, go directly north of the entrance, cut the vines blocking the way and head right to unlock the shortcut stairs. Then head west, cut the vines and enter the next room containing ants. Head north from this room and continue until you are in a room containing 3 plots of farming land; head east and then south out of this room (cut the vines) and then east again past the two monster gates and cut the vine to head east through the first room on the right. This room contains the stairs to B2F.
Monster Gates: 10
Enemies: Ant, Chitter, Spring
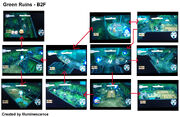
Floor B2F[]

B2F Map
On this floor, you start in the eastern sector next to the stairs; there are vines blocking the exit to this room, cut them and then head west. Once out of this room, continue to head west until you find a door, open this door to unlock the shortcut from B1F-B3F. With this room unlocked, go out and then head west again past the mining rocks and the Slimes and then run south until you find a vine blocking the next room. Cut the vine and kill the spring blocking the way, then head west out of this room until you find yourself in a hallway that angles upward; follow it until you find another net of vines. Once these vines are cut, head out of the hallway and then west again until you find another opening which will be blocked by a spring, some more vines, and another monster gate. You will need to destroy these in order to head into this room; head south through the two doors, either ignoring or fighting the Slimes blocking the way and south some more to find a plot of land and stairs to B3F.
There are 4 chests and 7 crates on this floor.
Monster Gates: 11
Enemies: Big Muck, Slime, Spring, Wooly
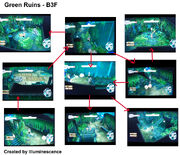
Floor B3F[]

B3F Map
You start on the southwestern sector of this floor. Head north past the monster gate into a room containing 2 large plots of soil. From this room, head east to the inner circle and then around the inner circle toward the east, taking care not to get poisoned or fatigued along the way. On the eastern side there is a net of vines blocking entry to another room, cut these to gain entry, and then head south into another room containing a plot of soil. Head west and then north out of this room, cut the vines and head into the inner circle. Along the way, unlock the door to the B2F-B4F shortcut and then head west on the inner circle until you find another opening leading to the stairs to B4F. You need to go into this entrance to fight the boss and to unlock the door to the boss.
There are 2 chests and 6 crates on this floor; one of the chests is blocked off in a room by some stones which require the silver hammer to break.
Monster Gates: 8
Enemies: Buffamoo, Clucky, Hornet, Little Mage
Floor B4F[]


B4F Map
This room contains 3 chests, 3 crates and 2 large plots of land. There are rocks blocking off access to 2 of the chests, which requires a Silver Hammer to break. From here the boss room can be accessed to do battle with the Giant Clucky.
Monster Gates: None
Enemies: Giant Clucky (Boss)
Boss Strategy[]
Giant Clucky (Chicken Boss)[]
(Suggested weapons: Iron Sickle or any weapon with a SA of 1 or higher)
Location B4F . Bosses can be fought multiple times in this game. Every time you beat a boss for the first time all previously beaten bosses get more powerful, including the one that you just defeated.
Attack pattern
Ground:
- Smash - if it is facing away from you and you are close, this is normally its counterattack. otherwise try to dodge by putting some distance between raguna and the boss.
- Charge(sometimes slips/hits the wall) - best chance to attack if you managed to dodge/heal
- projectile - a spreading area attack, keep your distance and avoid by staying in a spot between the projectiles after they have spread or dodging to either side (if you're too close).
Flying:
- Charge - avoid this attack by running to either side
- lays 4 eggs - these eggs hatch shortly after they hit the ground; destroy them before they hatch to avoid the additional enemies or ignore them so no more will be created. Chances are that the boss will kill them off.
Golem[]
Location B1F
Attack pattern
- Spins and punches the ground - no pause after this attack. Avoid as much as possible.
- Fireball - transforms and shoots 4 pairs of fireballs in the direction of the main character; pauses briefly.
- Exploding fireball - animation is the same as 2 except golem will "charge" this attack shortly before unleashing it; pauses briefly.
- Fist projectiles - shoots fists out straight ahead and pauses briefly, leaving an opening.
Try to keep this boss on the edge of your view as you dodge his attacks so that you know the direction he's facing when he unleashes one of his attacks. It also helps to judge the differences between attacks 2 and 3 mentioned above. If Golem has managed to hit you, use the pauses between any of his attacks to heal as the animation seems to leave you vulnerable for an attack.
Brodik[]
Location B1F
Challenges Raguna after the defeat of his Golem.
Attack pattern
- Screw attack - pauses briefly
- Flip kick - no pause
- Sword slash - brief pause
- Charged slash - brief pause
Brodik only takes damage from behind and is very quick. It is best to either use a battle monster to distract him or to use the pause after his screw attack to take a shot at him. Avoid using special attacks during this battle as he tends to counterattack often. Keeping him on the edge of your view helps to discern what his next attack will be. Since his attacks do a lot of damage, it might be a good idea to carry a few energy drinks to use during the pauses between his attacks. I recommend to try using a Hell Branch and hit him when he has the Screw Attack done. Pay attention that if you don't have Brodik in your visual, he might try to run after you to perform a Charged slash.
Main Page
Back to Dungeons